Skip to content
Redlamp
The Redlamp app icon: a glowing ruby safelight lens in a steel bezel

Pre-alpha · macOS 26

Lightroom's workflow.
Native to your Mac. Open source.

Redlamp is a RAW photo editor built from scratch in Swift and Metal for Apple Silicon. It keeps the panels, sliders and shortcuts you already know, renders every change within a frame, and never touches your originals.

statusearly alpha previewlicenseMPL-2.0open sourceyespricefree, no subscriptionAIon-deviceruns onmacOS 26 · Apple Siliconbuilt withSwift · Metal
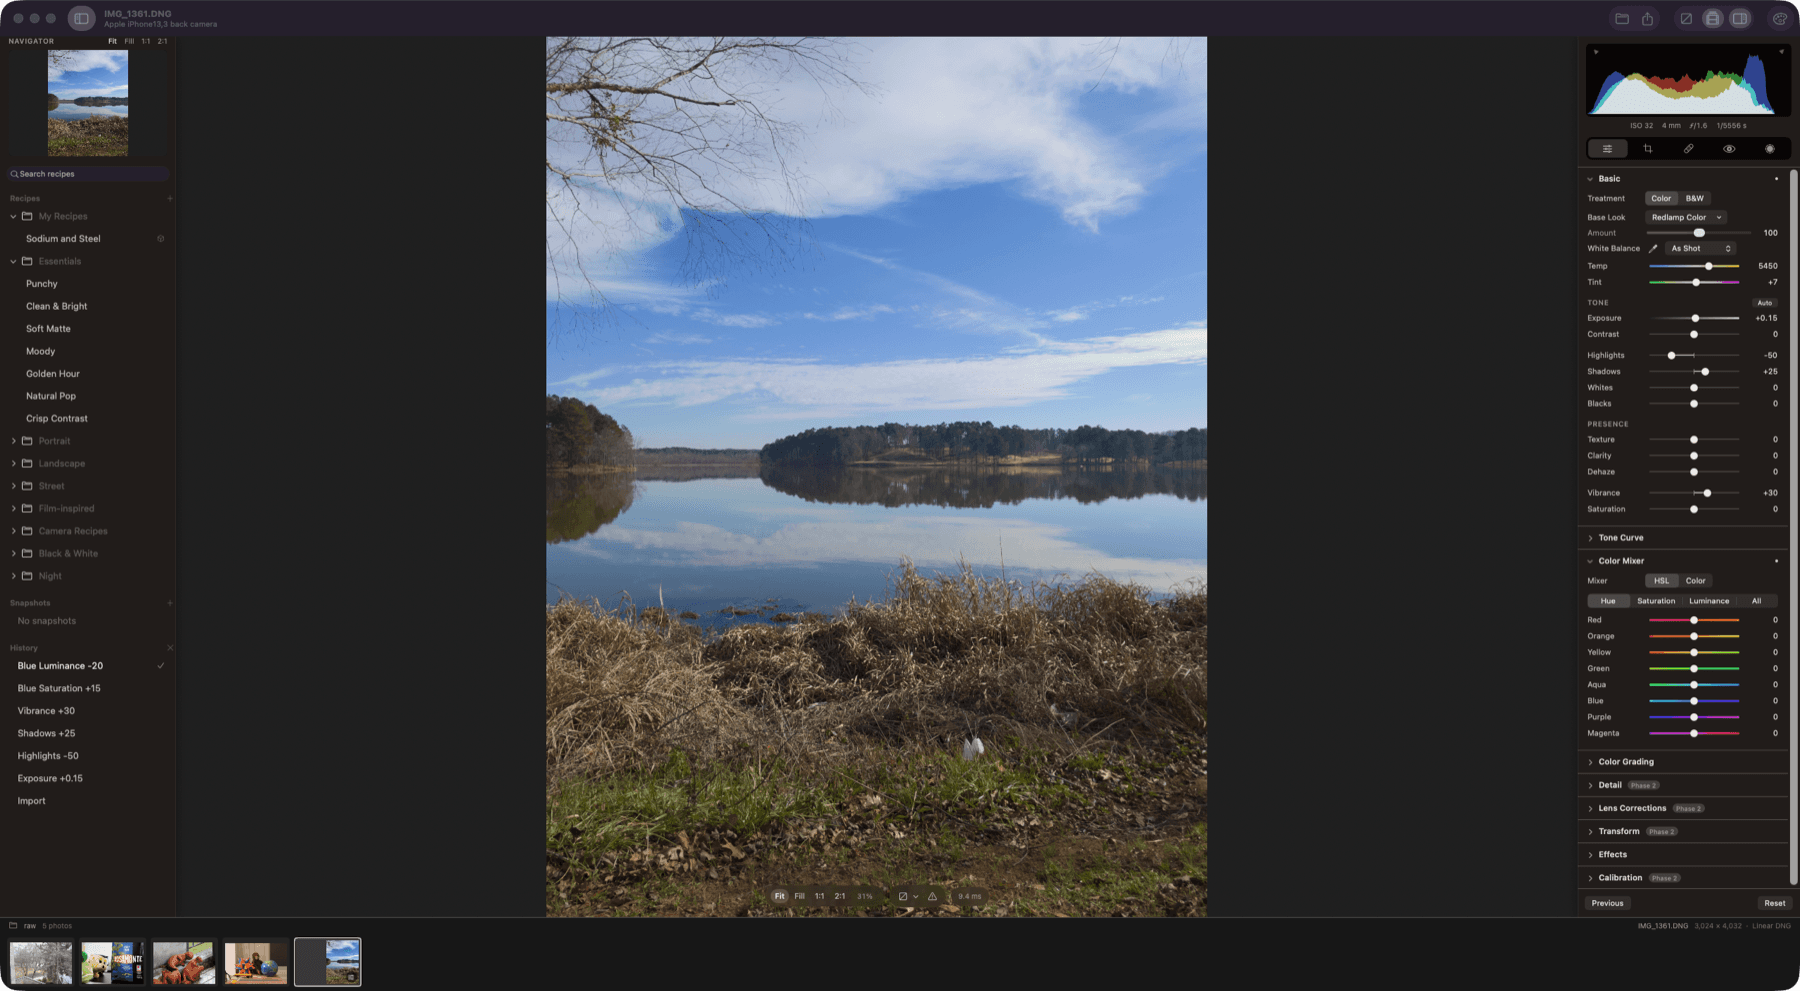
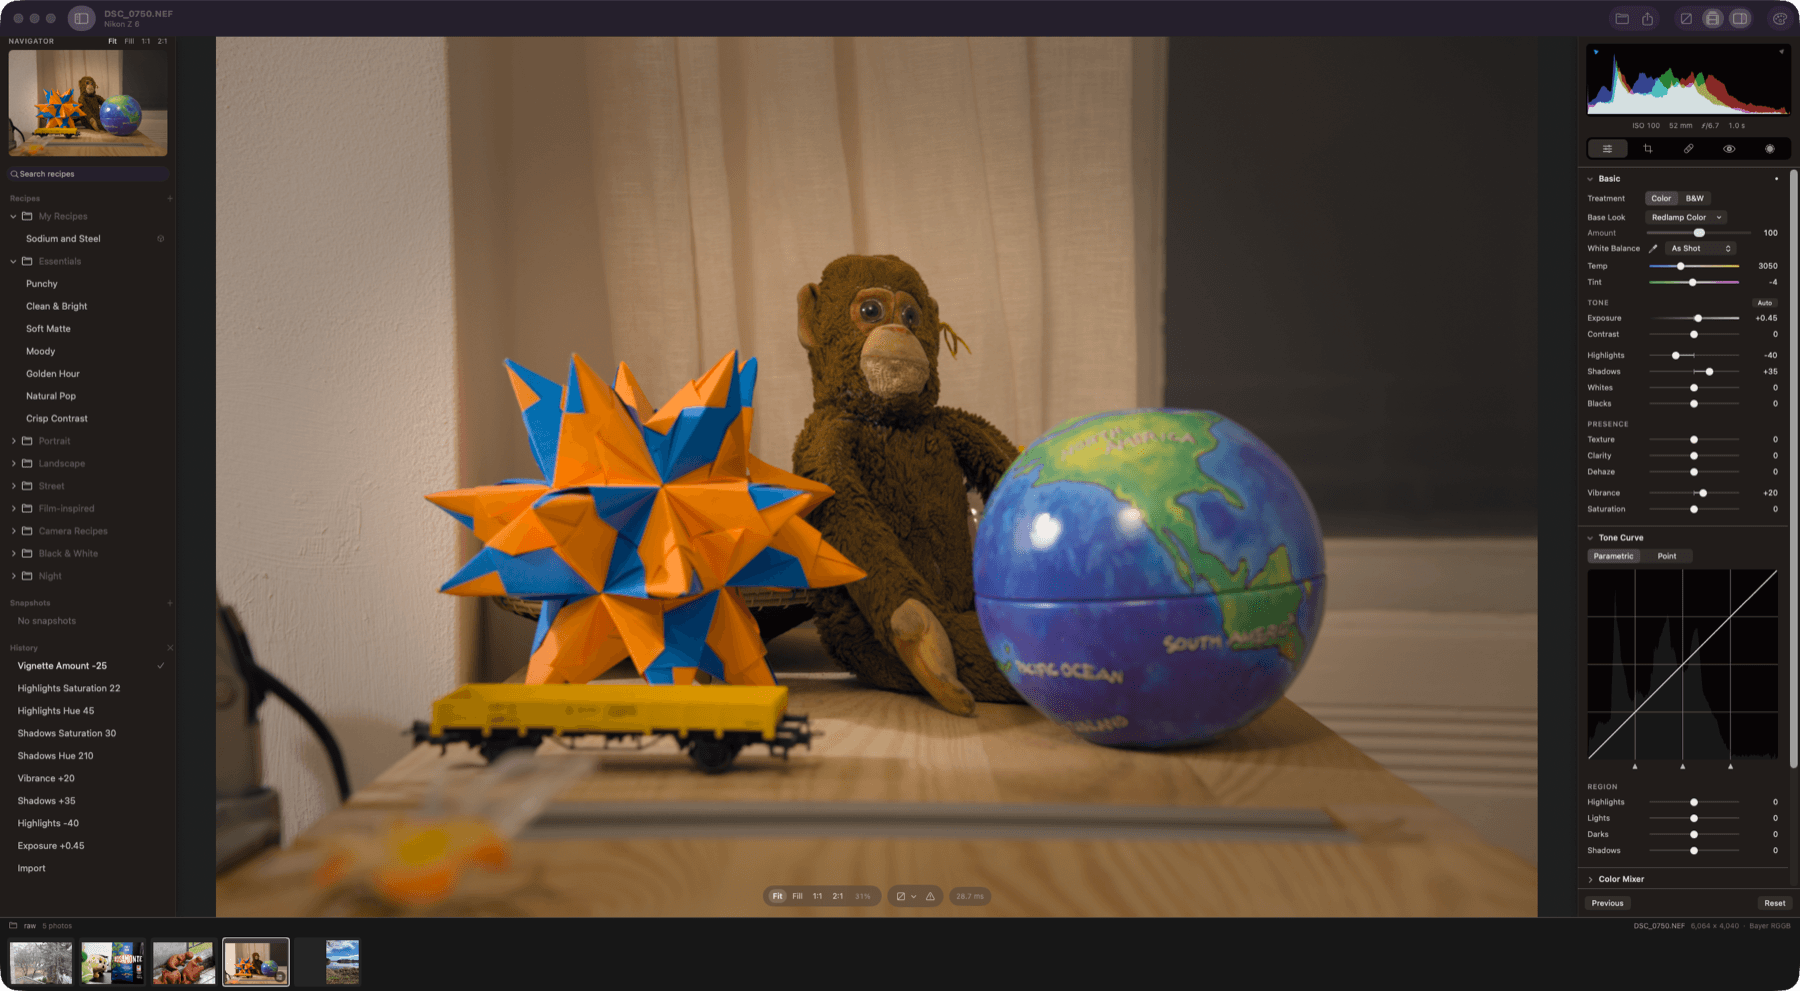
Redlamp editing a Nikon Z 6 raw file, with the Develop panels on the right
Editing a Nikon Z 6 raw file.

Why Redlamp

A red lamp is the darkroom safelight: the one light you can work by without fogging the paper.
You can see and shape your photo freely, and the original is never harmed.
Lightroom defined how millions of photographers edit, but it's a cross-platform application that doesn't feel at home on a Mac, and it's tied to a subscription and a cloud.

Redlamp keeps the workflow photographers already know, including the panel layout, slider names and ranges, and keyboard shortcuts, and rebuilds everything underneath as a native, GPU-first, open-source application.

Redlamp is an editor, not a catalog. It opens folders of photos and keeps your edits in small sidecar files right next to them.

01

Instantly familiar

Lightroom's panels, slider names, ranges and shortcuts. Conventions copied, never Adobe's assets.

02

Masks from day one

Every edit is a layer with a mask, combined by add, subtract and intersect, with on-device AI masks to come.

03

Native, neutral UI

macOS 26 design, Liquid Glass only on floating chrome, and neutral grey wherever you judge colour.

04

Under 16 ms

Rendering and UI are strictly separated. The UI never waits on the engine, the disk or the GPU.

05

Serious colour

Scene-referred and linear, with camera profiles, LUTs and looks fitted by measurement.

06

Computational photography

Best-in-class denoise, one-click focus stacking, and AI only where it clearly wins, on the device.

07

Mac first

One platform-neutral engine. The Mac editor comes first; iPad and iPhone follow from the same engine.

08

Open source

MPL-2.0, compatible with the App Store, with algorithms implemented clean-room from papers.

What works today

A complete Develop module, built for Apple Silicon.

The core RAW pipeline and the Develop workspace work today on macOS 26. Every screenshot here is the app itself, on CC0 sample raws.

Develop

Lightroom's workflow, at home on the Mac.

The Develop module's layout, panel order, slider names, ranges and defaults, and single-key shortcuts all carry over, so there's nothing to relearn. Everything underneath is rebuilt as a native, GPU-first app.

  • Basic, Tone Curve, Color Mixer, Color Grading, Detail and Effects
  • Lightroom Classic's shortcuts: 80 actions on 84 key bindings
  • Find an adjustment (⌘F) by name, or by the words people use
  • Before and after in three layouts, cached so edits never re-render it
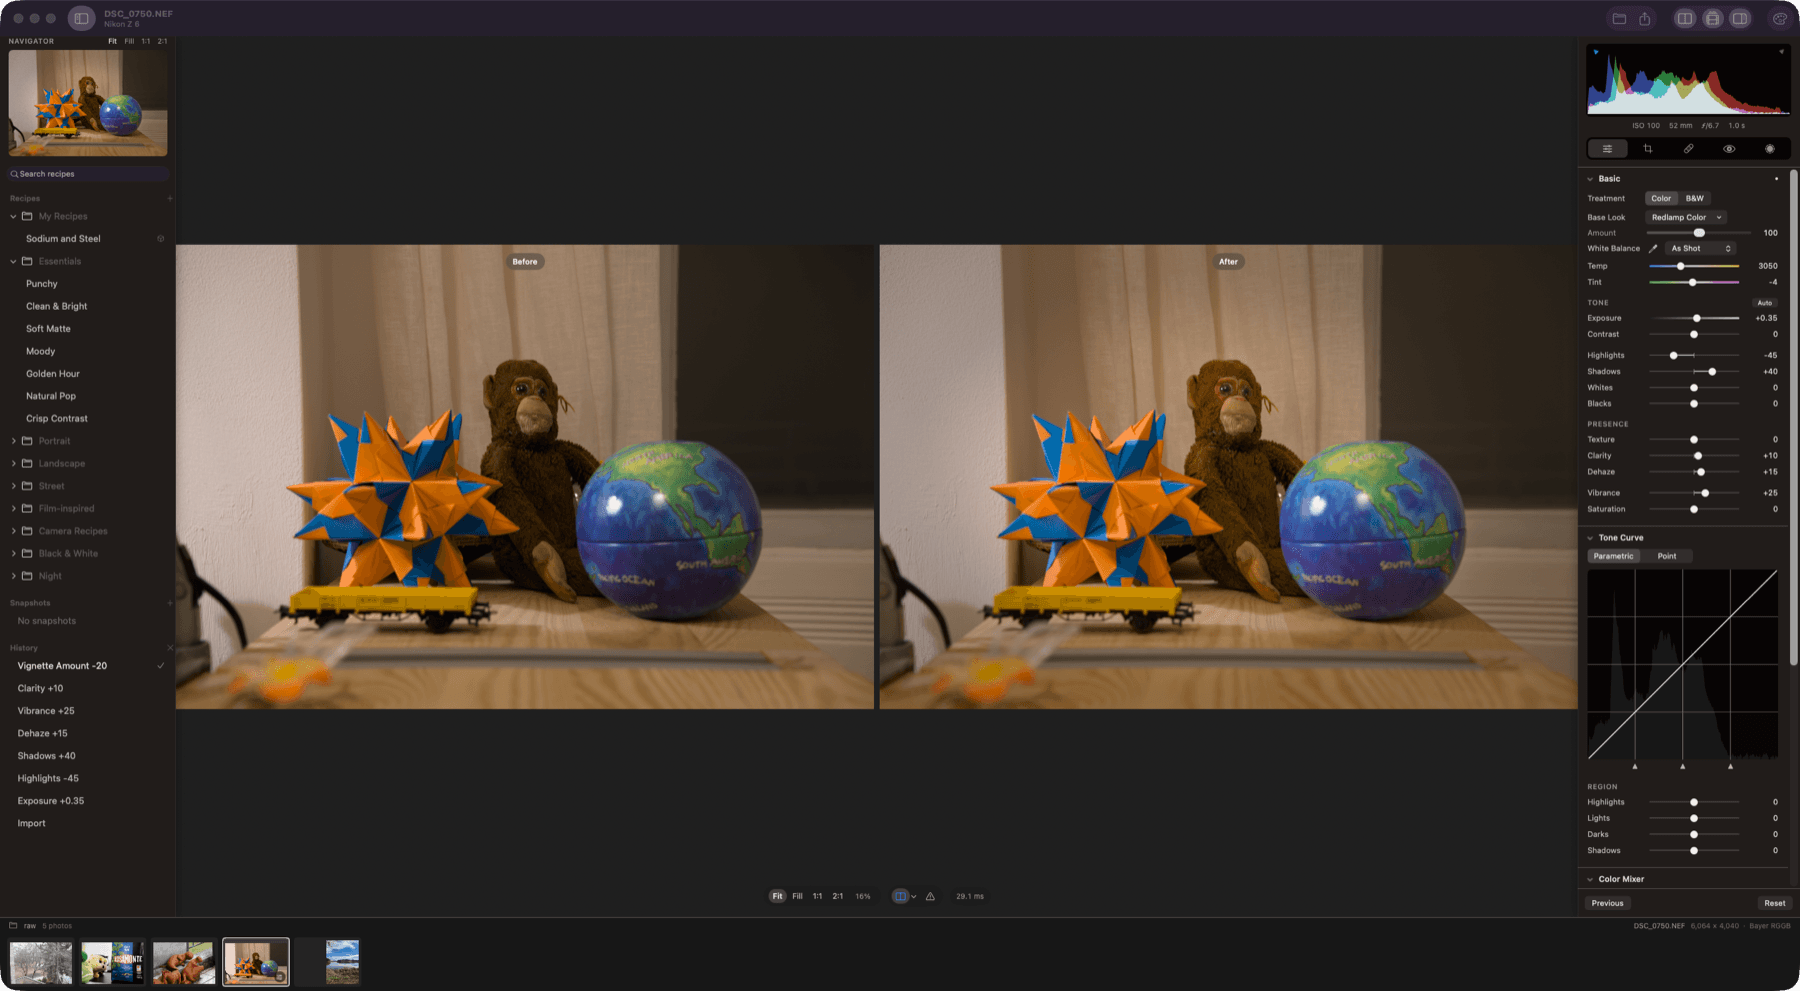
Before and after, side by side, on a Nikon Z 6 raw file
Before and after on a Nikon Z 6 NEF: Exposure, Highlights, Shadows, Dehaze, Clarity and Vibrance.

Responsiveness

Every slider lands within a frame.

One fused Metal kernel applies every adjustment, frames arrive as IOSurfaces without a copy, and rendering never waits on the main thread. Drag a slider and the photo keeps up.

  • Interactive renders at Fit in 0.6 to 3 ms on Apple Silicon
  • A full 26 MP frame at 1:1 in about 13 ms
  • Latest-wins scheduling: a burst of slider events collapses to the newest
  • A full mip pyramid, so every zoom level samples the right resolution
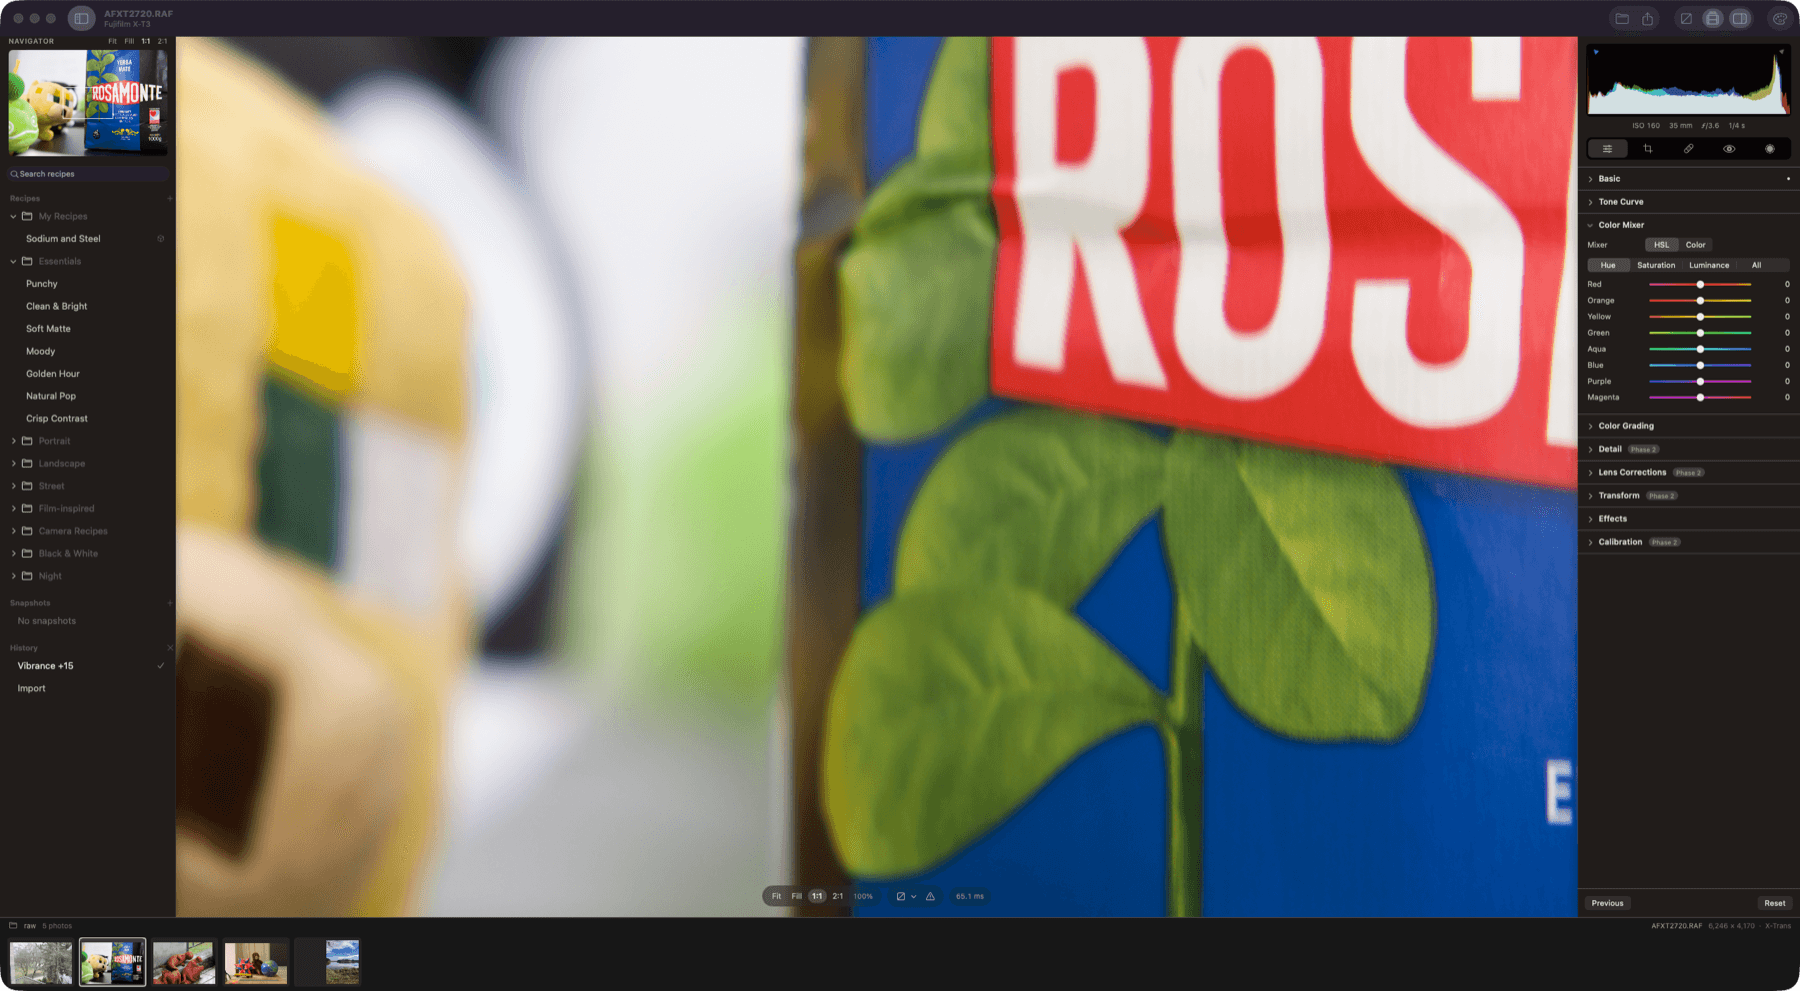
A Fujifilm X-T3 X-Trans raw file at 100%, with the Color Mixer in HSL mode
A Fujifilm X-T3 X-Trans RAF at 1:1, rendered in about 13 ms.

Masking

Masks are part of the architecture, not an afterthought.

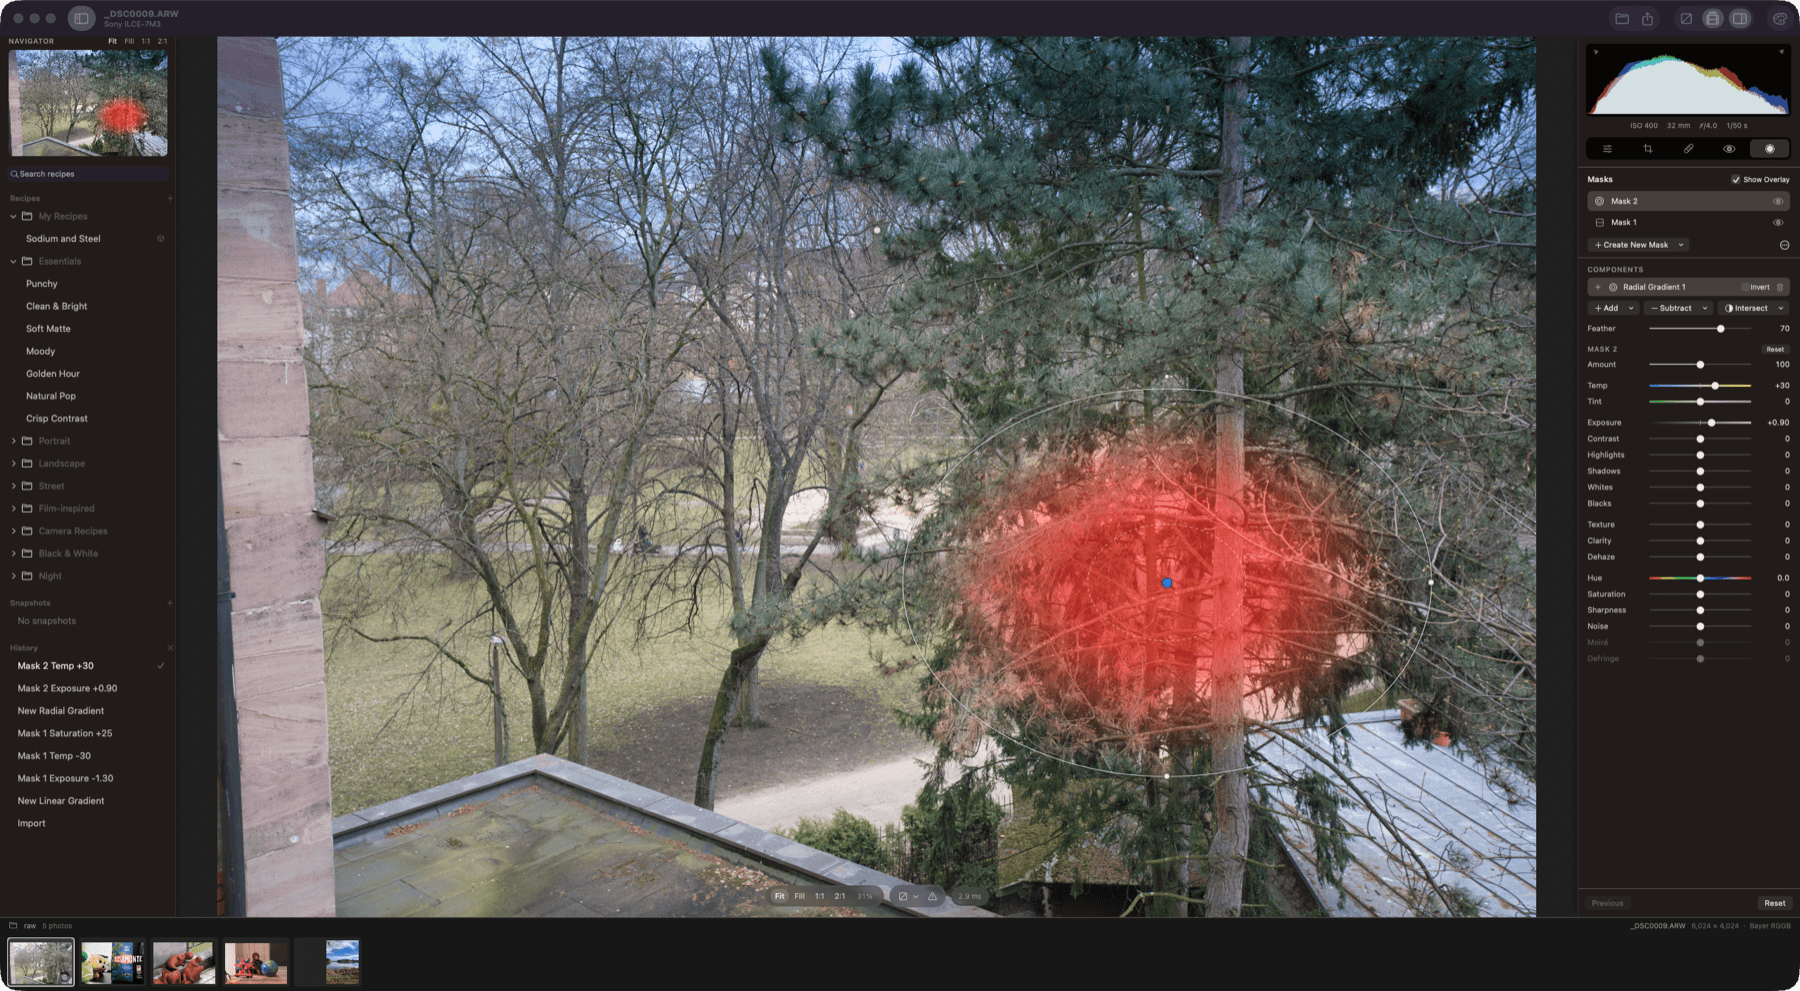
Every edit is a layer: its own adjustments plus a mask built from components that add, subtract and intersect, exactly as in Lightroom. Masks are evaluated per pixel inside the same GPU kernel, so 16 of them cost well under a millisecond.

  • Linear and radial gradients, drawn and adjusted on the photo
  • 15 local adjustments, including Texture, Clarity and Dehaze
  • A red mask overlay, and a full mask list
  • Brush, colour range and on-device AI masks are next
Masking on a Sony A7 III raw file, with the red mask overlay over the sky
A linear gradient darkens and cools the sky; a feathered radial gradient warms the trees.

Colour

Serious colour science, scene-referred from the start.

The pipeline is linear and scene-referred, with a proper camera white-balance model. The Color Mixer works in OKLCh, so hues move the way your eye expects, and some looks are measured against cameras' own renderings.

  • Temperature and Tint with Robertson's method and the camera's matrix
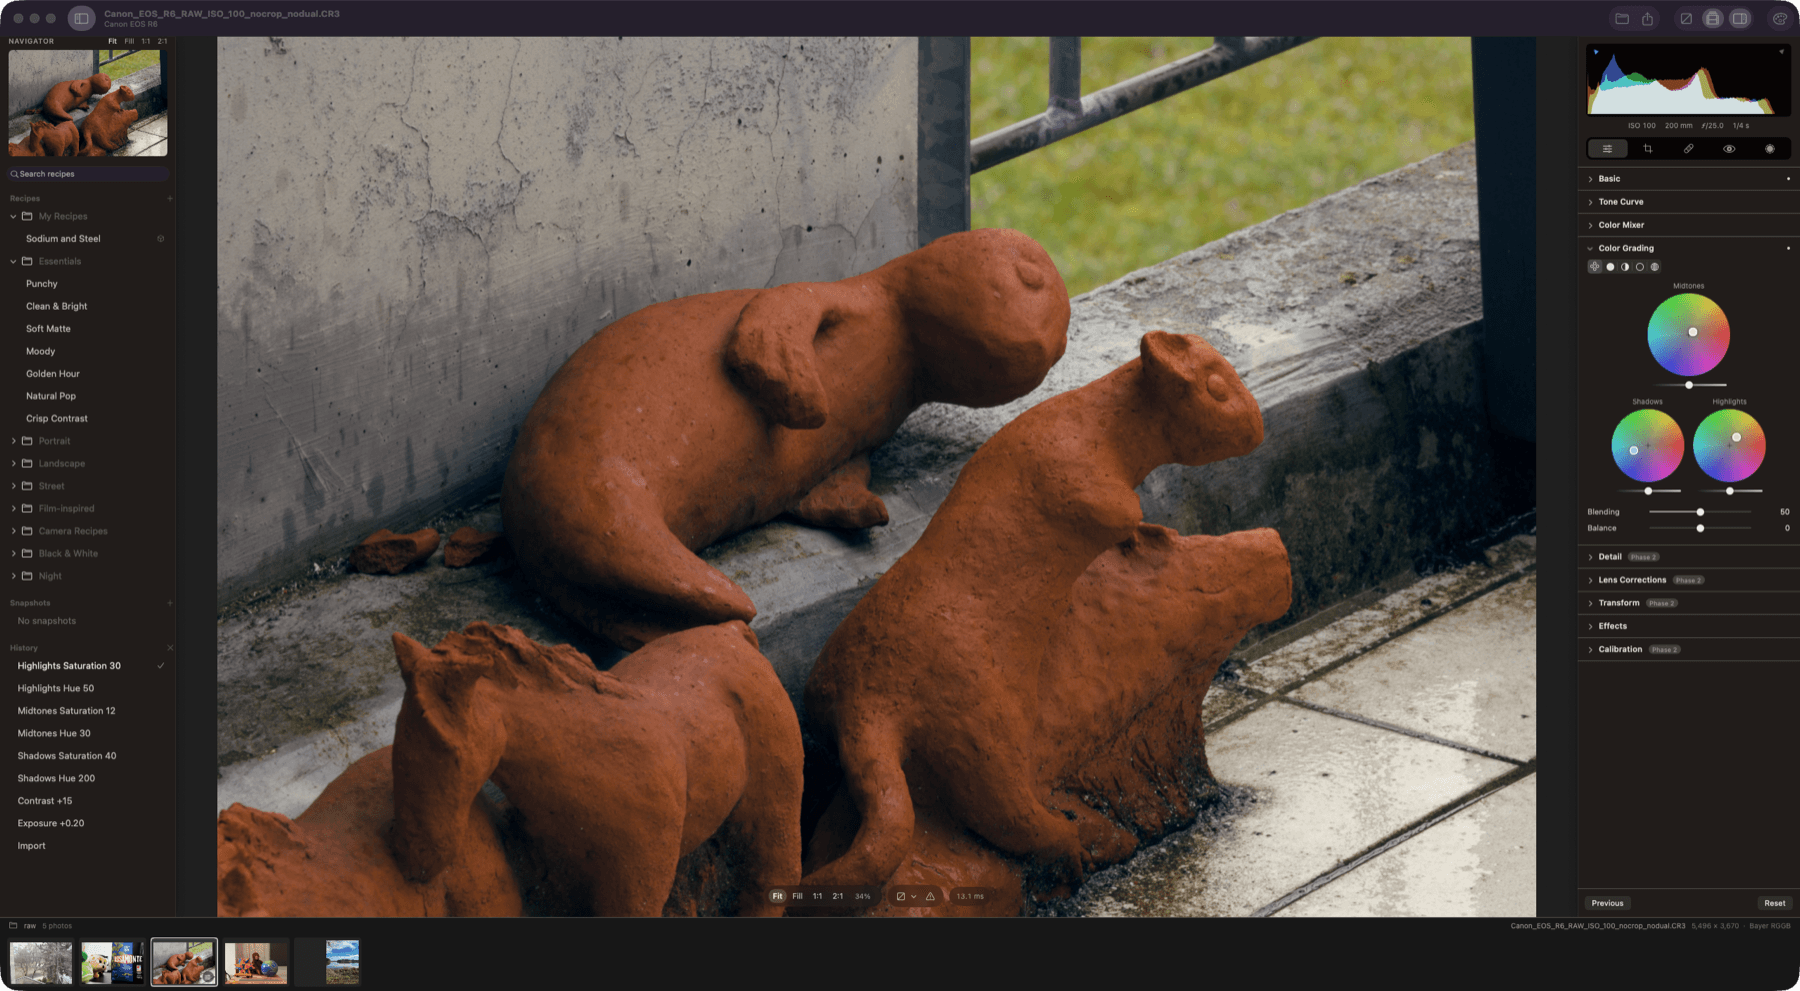
  • 3-way and individual colour-grading wheels, with Blending and Balance
  • Parametric and point tone curves
  • Measured looks: Standard v3 sits within ΔE 3.26 of the camera's Provia
Colour grading a Canon EOS R6 raw file with the 3-way wheels
Split-toned shadows and highlights on a Canon EOS R6 CR3.

Detail

Noise reduction that knows your camera's noise.

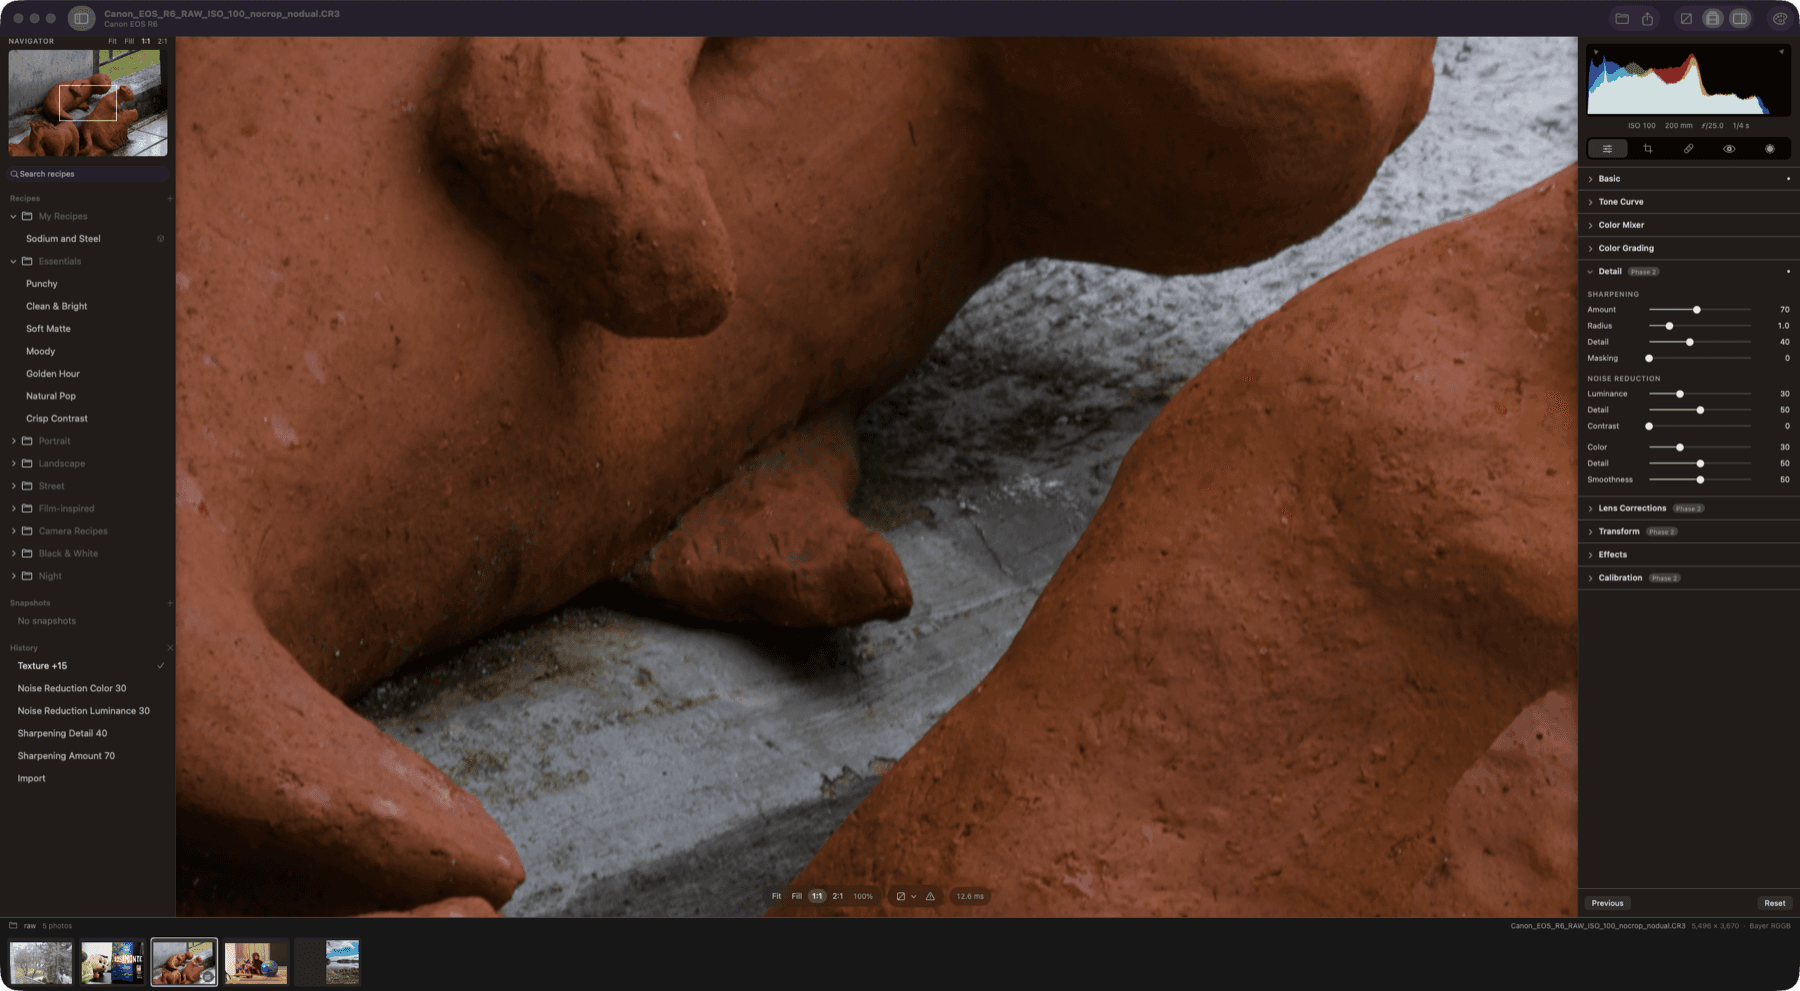
Noise reduction scales to each photo's own noise, read from the DNG or measured from the raw data when it opens. Sharpening measures detail on a denoised copy, so grain passes through untouched instead of being sharpened.

  • Luminance and Color noise reduction with Lightroom's controls
  • Noise-aware sharpening, from unsharp mask towards deconvolution
  • Texture, Clarity and Dehaze, globally and inside masks
  • Highlight reconstruction rebuilds clipped photosites
A Canon EOS R6 raw file at 100% with the Detail panel open
Detail at 1:1 on a Canon EOS R6 CR3.

Recipes

Presets, profiles and LUTs, finally in one place.

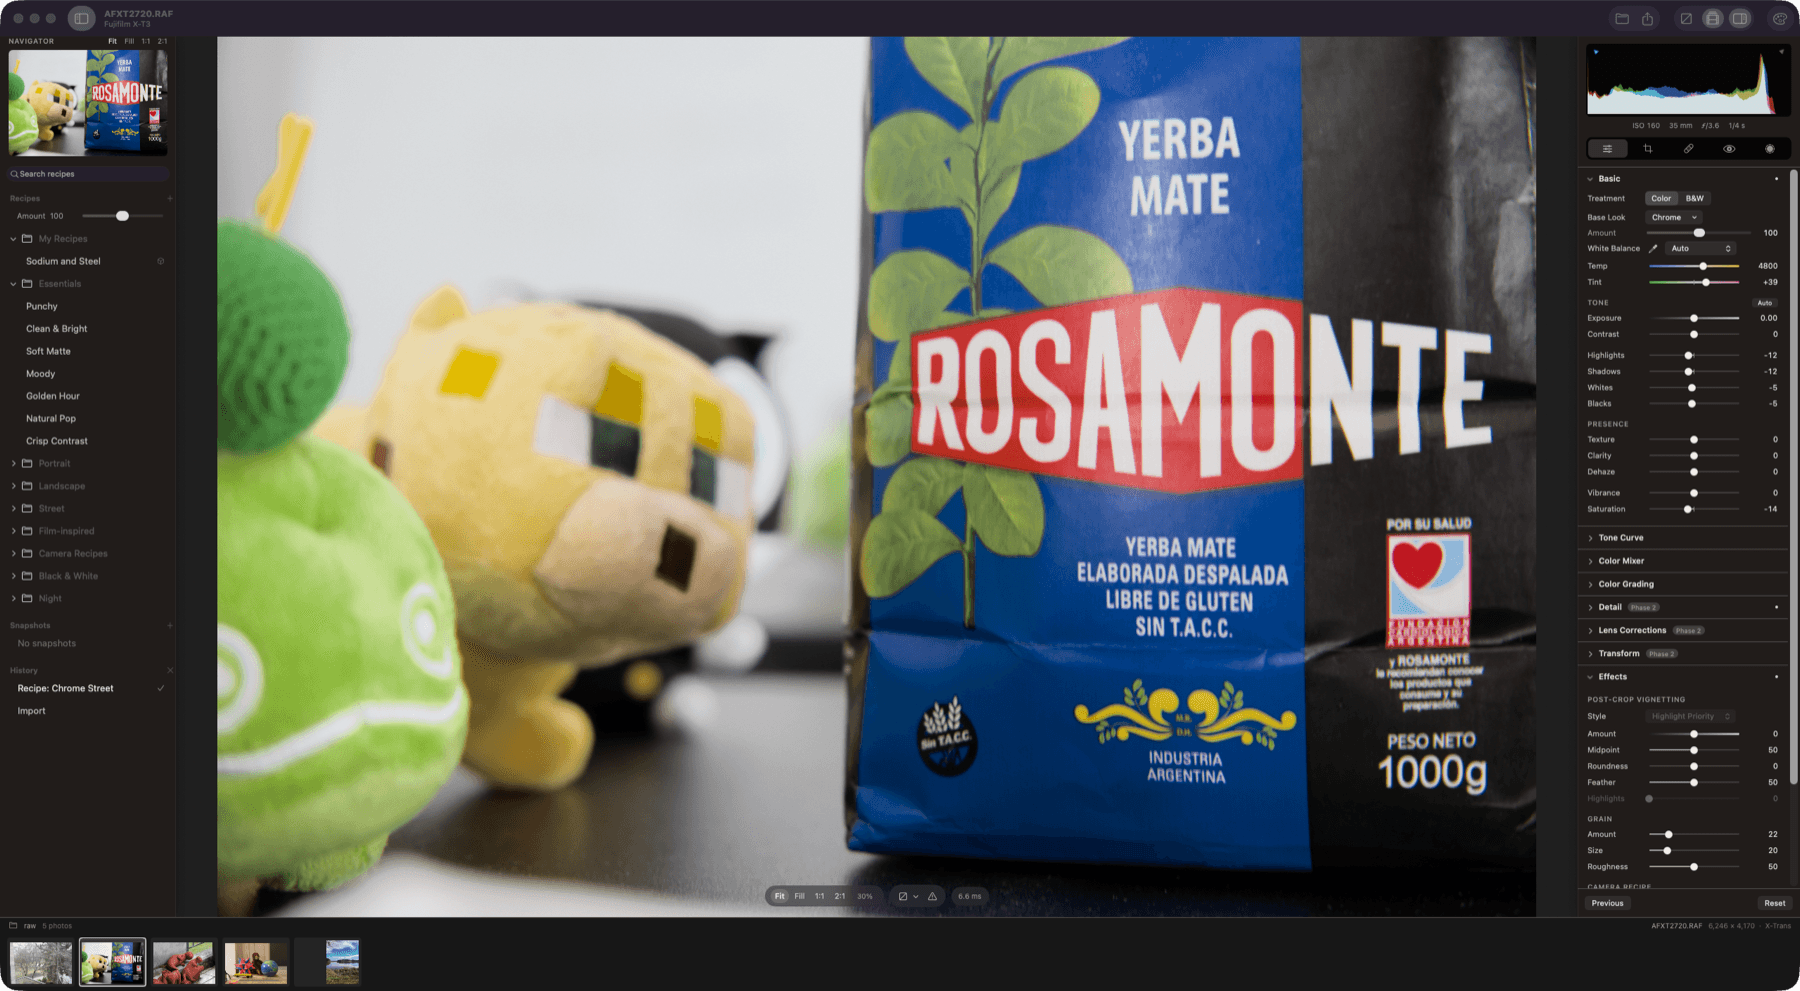
A Recipe is anything that gives a photo a look. One open format holds presets, profiles (a recipe's Base Look) and LUTs, and you can type in a Fujifilm-style camera recipe card exactly as it's written.

  • 39 bundled recipes in eight groups, with hover to preview
  • Import and export .redrecipe, .cube and HaldCLUT
  • Camera controls: Dynamic Range, Color Chrome and white-balance shift
  • The Recipe Lab checks every look across a 40-image set
A camera recipe applied to a Fujifilm X-T3 raw file
Chrome Street, built from a Fujifilm-style recipe card, on the measured Chrome Base Look.

Our own RAW pipeline

Your originals are never touched.

LibRaw only unpacks the file. Black levels, white balance, demosaicing and colour all happen in Redlamp, on the GPU. Edits are saved to a small sidecar next to each photo, and the original stays exactly as you shot it.

  • Menon demosaic for Bayer sensors, and X-Trans support
  • Hot-pixel repair, banding correction and DNG gain maps
  • Sony ARW, Canon CR3, Nikon NEF, Fujifilm RAF, Apple ProRAW and Pixel DNG
  • Plus JPEG, HEIC, TIFF and PNG
An iPhone 12 Pro ProRAW file in portrait orientation
iPhone 12 Pro ProRAW, with highlight recovery and blues tuned in the Color Mixer.

Focus stacking

Focus stacking in one click, and it still develops like a raw.

Redlamp spots a focus bracket in your folder and offers to merge it. Frames are stacked as demosaiced camera RGB before any edit, so every Develop slider still works on the result, and you can retouch from any frame.

  • Stacks are detected for you, with a Merge banner
  • Auto, Smooth and Detail strategies, and a depth map
  • 25 Canon CR3 frames merge in about 8 seconds
to open a 24–26 MP raw file
70–250 ms
to open a 24–26 MP raw file
per interactive render at Fit
0.6–3 ms
per interactive render at Fit
for a full 26 MP frame at 1:1
~13 ms
for a full 26 MP frame at 1:1
for a full-resolution export render
~45 ms
for a full-resolution export render

Measured on an Apple M1 Ultra with a Release build.

Everything that works today

From the README, last updated 1 October 2026.

RAW pipeline (our own, GPU-first)13 items
  • Decodes RAW files through LibRaw (unpacking only). Black levels, white balance, demosaicing, and color are all done by Redlamp on the GPU.
  • Bayer demosaic by directional filtering with a posteriori decision (Menon, Andriani and Calvagno, 2007), with a dual pass that takes plain green where the neighbours differ only by noise, a first-generation X-Trans demosaic, and linear DNG support (for example iPhone ProRAW).
  • Hot pixels are repaired before demosaicing, judged against each photo's own noise level.
  • Row and column banding is measured in the sensor's masked (optical-black) margins and subtracted with the black level, only where the margins show more than their own noise.
  • DNG gain maps (OpcodeList2), such as phones' lens shading correction, are applied before demosaicing, and noise reduction scales with the noise they amplify.
  • Highlight reconstruction: channels are no longer clipped at 1 after white balance, and photosites that did clip are rebuilt from their bright unclipped neighbours, using the colour measured around the clipped area. Fully blown areas stay neutral.
  • Tested on Sony ARW, Canon CR3, Nikon NEF, Fujifilm RAF (X-Trans), Apple ProRAW DNG and Google Pixel DNG, plus JPEG, HEIC, TIFF, and PNG.
  • The demosaiced image is cached as a full mip pyramid, so interactive renders sample the right resolution for the zoom level.
  • A single fused Metal kernel applies every per-pixel adjustment. Frames are delivered as IOSurfaces, so pixels are never copied between engine and UI.
  • Latest-wins render scheduling: a burst of slider events collapses to the newest one.
  • Rendering stays off the main thread while you drag a slider. Frames go straight to the canvas, which a dedicated display-link thread presents, and each view observes only the values it shows.
  • Both side panels are AppKit: the histogram, tool strip and every Develop and Masking panel on the right, and the Navigator, Recipes, Snapshots and History on the left. They match the SwiftUI originals pixel for pixel, and a component harness is used to build and review them (see Component harness).
  • Temperature and tint use a proper camera white-balance model (Robertson's method with the camera's color matrix). As Shot, Auto, and the illuminant presets all work.
Develop adjustments that render11 items
  • White balance: Temp and Tint, the presets, Auto, and the eyedropper.
  • Basic: Exposure, Contrast, Highlights, Shadows, Whites, Blacks, Vibrance, and Saturation, plus the Auto button.
  • Treatment (Color or B&W) and Base Looks (Lightroom's profiles) with an Amount slider (0–200) and a browser that renders every look on the photo. There are six built-in looks (Redlamp Color, Neutral, Vivid, Landscape, Portrait and Monochrome) and 15 film-style looks built on 3D look tables: slide, chrome, negative, cinema, bleach and black and white through color filters. Four of them are measured from cameras' own renderings by the look profiler (see Recipes and looks).
  • Tone Curve: a parametric curve with split points, and a point curve with presets.
  • Color Mixer: HSL (Hue, Saturation, Luminance, and All) and a per-color mode, working in OKLCh.
  • Color Grading: 3-way and individual wheels, Blending, and Balance. It also tints B&W images for split-toning.
  • Effects: post-crop vignette (amount, midpoint, roundness, feather) and zoom-stable film grain.
  • Noise reduction (Detail panel): Luminance with Detail and Contrast, and Color with Detail and Smoothness. It is scaled to each photo's own noise, read from the DNG NoiseProfile tag or measured from the raw data when the file opens. It runs as a cached stage in front of the fused kernel, so other sliders stay as fast as before, and exports render in tiles.
  • Sharpening (Detail panel): Amount, Radius, Detail and Masking, in the same cached stage after noise reduction. It is noise-aware: detail is measured on a denoised copy of the luminance and applied to the untouched image, so the photo's noise and grain pass through as they were instead of being sharpened. Detail moves from a halo-limited unsharp mask towards Richardson–Lucy deconvolution of the Radius's blur, and holds back halos on strong edges; Masking keeps flat areas untouched. It boosts luminance detail in stops, so it doesn't depend on exposure and leaves colors alone.
  • Texture and Clarity (global): gains on medium (about 2–8 px) and larger (about 8–64 px) luminance detail, taken from the image pyramid in the same cached stage, so tiles and zoom levels agree. Negative values soften.
  • Dehaze (global and in masks): the dark channel prior (He, Sun and Tang, 2009) with the airlight and a haze map measured when the photo opens; negative values add a neutral veil.
Masking (Lightroom's model)6 items
  • Each mask is a layer: its own adjustments plus a mask built from components. Components combine with Add, Subtract, and Intersect, and each can be inverted.
  • Linear and radial gradient components. Draw them on the photo. Drag the handles to move, resize, and rotate; radial gradients also have a Feather control. Pins select the other masks.
  • Local adjustments: Temp, Tint, Exposure, Contrast, Highlights, Shadows, Whites, Blacks, Texture, Clarity, Dehaze, Hue, Saturation, Sharpness, and Noise, plus the mask's Amount (0–200%).
  • Mask management: a red mask overlay (O), and a mask list where you can show and hide, rename, duplicate, "duplicate and invert", reset, and delete masks.
  • Fast by design: masks are evaluated analytically, per pixel, inside the same fused GPU kernel. Up to 16 masks cost well under a millisecond extra at Fit.
  • The Create New Mask grid already lists every Lightroom mask type (Subject, Sky, Background, Objects, People, Landscape, Brush, Color, Luminance, and Depth Range). Each shows the phase it arrives in.
Focus stacking (a separate Stack workspace)6 items
  • Stacks are found for you: runs of frames with the same camera settings a moment apart, whose sharp region moves from frame to frame, get a "Focus stack detected: N frames" banner with Merge. Bursts, time-lapses and pans aren't offered.
  • The result develops like a raw. Frames are stacked as demosaiced camera RGB before any edit, so every Develop slider, white balance included, works on it. The stack is a small .redlampstack document beside the frames; the merged pixels are cached and rebuilt when needed.
  • Alignment follows focus breathing, rotation and shift, brightness is matched frame to frame, and a depth map records which frame is sharpest where.
  • Auto, Smooth and Detail: Auto takes tone and color from the depth map and fine detail from the sharpest frames near it; Smooth blends between frames for clean surfaces; Detail keeps the sharpest detail from anywhere, for hair and bristles.
  • The Stack workspace: leave frames out, switch methods (each merge is cached), view the depth map, and retouch by painting the frame under the cursor, a chosen frame or another method's result over the merge.
  • One frame is in memory at a time, and redlamp stack does the same from the command line.
Workspace13 items
  • A Lightroom-style layout. On the left: Navigator, Recipes, Snapshots, and History. In the center: the photo, with the filmstrip below. On the right: histogram, tool strip, and the Develop panels in Lightroom's order.
  • Sliders: click to jump, drag to adjust, Shift-drag for fine control, double-click to reset, and click the value to type one in. Option-dragging a tone slider shows clipping, as in Lightroom.
  • Panels: double-click a panel or group title to reset it, and Option-click a header for Solo Mode.
  • Histogram: clipping indicators, and you can drag across it to adjust Blacks, Shadows, Exposure, Highlights, or Whites.
  • Recipes (Lightroom's presets, profiles and LUTs, in one): 39 bundled recipes in eight groups, including camera-style ones built from Fujifilm-style recipe cards. Hover to preview, click to apply, then adjust the recipe's Amount. You can search (Lightroom's words work), mark favorites, save the current edit as a recipe with a settings checklist (⇧⌘N), and import or export .redrecipe, .cube and HaldCLUT files. Snapshots and full undo/redo history are also available.
  • Camera-recipe controls in the Effects panel: Dynamic Range, Color Chrome, Chrome FX Blue, and red and blue white-balance shift.
  • Viewing: Fit, Fill, 1:1, and 2:1 zoom, click to zoom, pan, pinch, and a clipping overlay. Sensor clipping (⌥J) marks the photosites the camera clipped, in the colour of each clipped channel (black where all three did), whatever the edit has done since; the colour-assessment view (⇧L) puts the photo on middle grey inside a white frame (ISO 12646). Before/After (\) in three layouts, full frame, side by side and a diagonal split, cycled with Y and ⇧Y; the original is rendered once and cached, so edits don't re-render it.
  • Themes: Neutral greys by default, so nothing tints your judgment of color, plus a Redlamp theme and 20 dark and light families with a tint control, from the toolbar's Theme button or Settings (⌘,), which also has an About tab.
  • Lightroom Classic's keyboard shortcuts: 80 actions on 84 key bindings, from one registry that also drives the menus and an in-app ⌘/ reference (see Keyboard shortcuts).
  • Find an adjustment (⌘F): search the Develop sliders by name or the words people use (Lightroom's older names too), then jump to it; ⌘-scroll over any slider adjusts it (Shift coarse, Option fine), and value fields accept arithmetic such as x+10.
  • Culling while you develop: star ratings, pick/reject flags and color labels, shown on the filmstrip. There's also an Info overlay (I), Lights Out (L), full-screen preview (F), and Paste from Previous (⌥⌘V and the Previous button).
  • Non-destructive edits, saved automatically to a sidecar file next to each photo (IMG_1234.ARW.redlamp).
  • Export to JPEG, plus a headless redlamp command-line tool for rendering and export. Exports smaller than the photo are developed at full resolution and downscaled last, so sharpening, noise reduction and texture look the same at every size.

Film simulations

Eleven film stocks, simulated from their datasheets.

Most film presets are tuned by eye. Redlamp's are physical simulations, built from each manufacturer's own characteristic curves, spectral sensitivities and dye spectra, with the film's grain, halation and bloom.
  1. 1Each colour becomes a spectrum.
  2. 2The film's three layers record it through their own sensitivities.
  3. 3Characteristic curves turn exposure into dye, with interlayer effects and colour masking.
  4. 4A negative is printed or scanned the way a lab would; a slide is lit on a light box.
  5. 5The result is seen through the colour-matching functions of human vision.
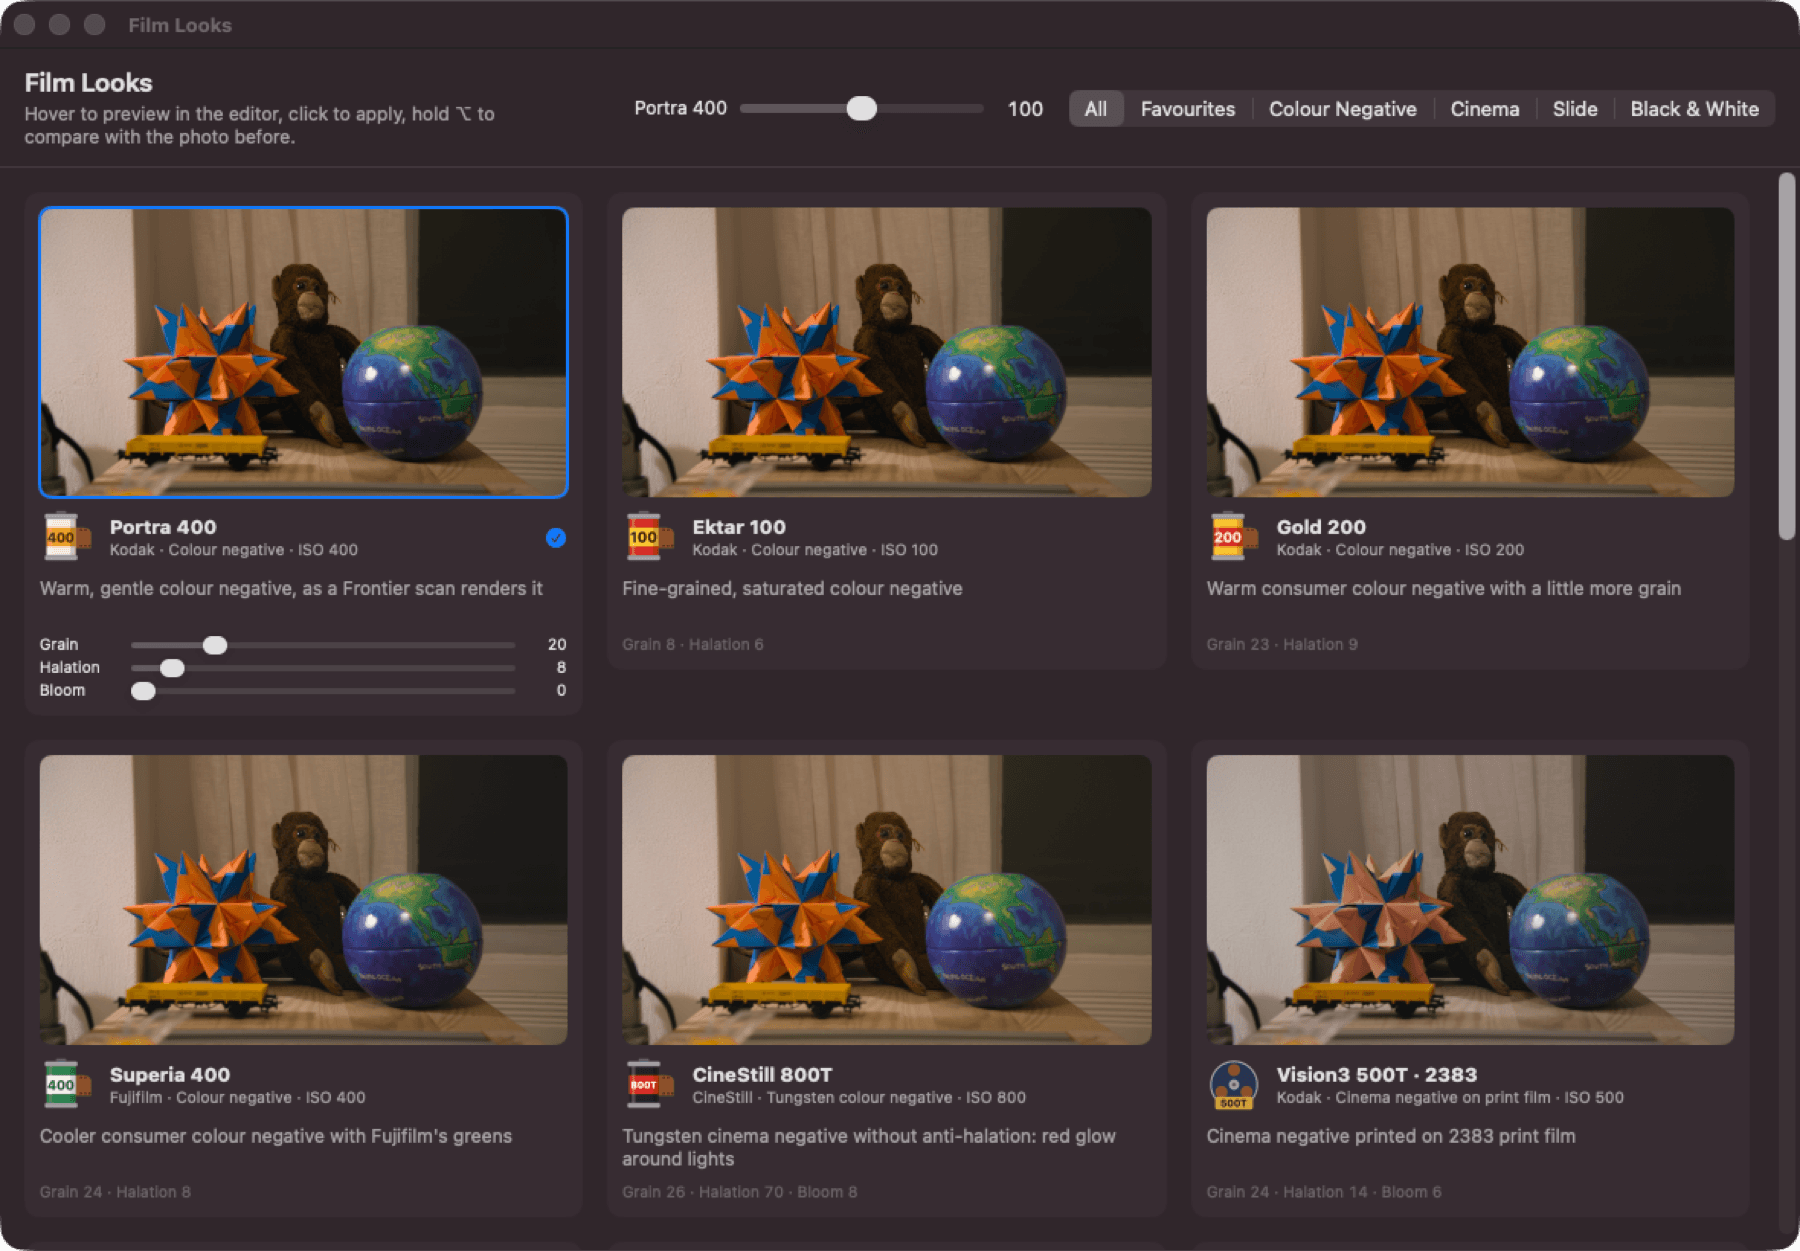
The Film Looks window: the open photo in every film, with Portra 400 applied
Window ▸ Film Looks shows the open photo in every film. Hover to preview; click to apply with its grain, halation and bloom.

Colour negative, ISO 400

Colour negative, ISO 100

Colour negative, ISO 200

Colour negative, ISO 400

Tungsten colour negative, ISO 800

Cinema negative on print film, ISO 500

Slide film, ISO 100

Slide film, ISO 50

Black and white negative, ISO 400

Black and white negative, ISO 400

Black and white print

How faithful are they?

  • The colour comes from the datasheets: each stock's own curves, sensitivities and dyes, keeping their published order of contrast and grain.
  • A lab's scan or print timing shapes the rest. The Frontier-like and Noritsu-like scanner profiles are characterised from how labs describe them, not measured.
  • Some data is borrowed or uncertain: Portra, Ektar, Gold and Superia borrow Vision3's dye curves, and the 2383 sensitivity curve is the least certain trace.
  • Grain doesn't yet vary with density, and is sized in pixels rather than relative to the frame.
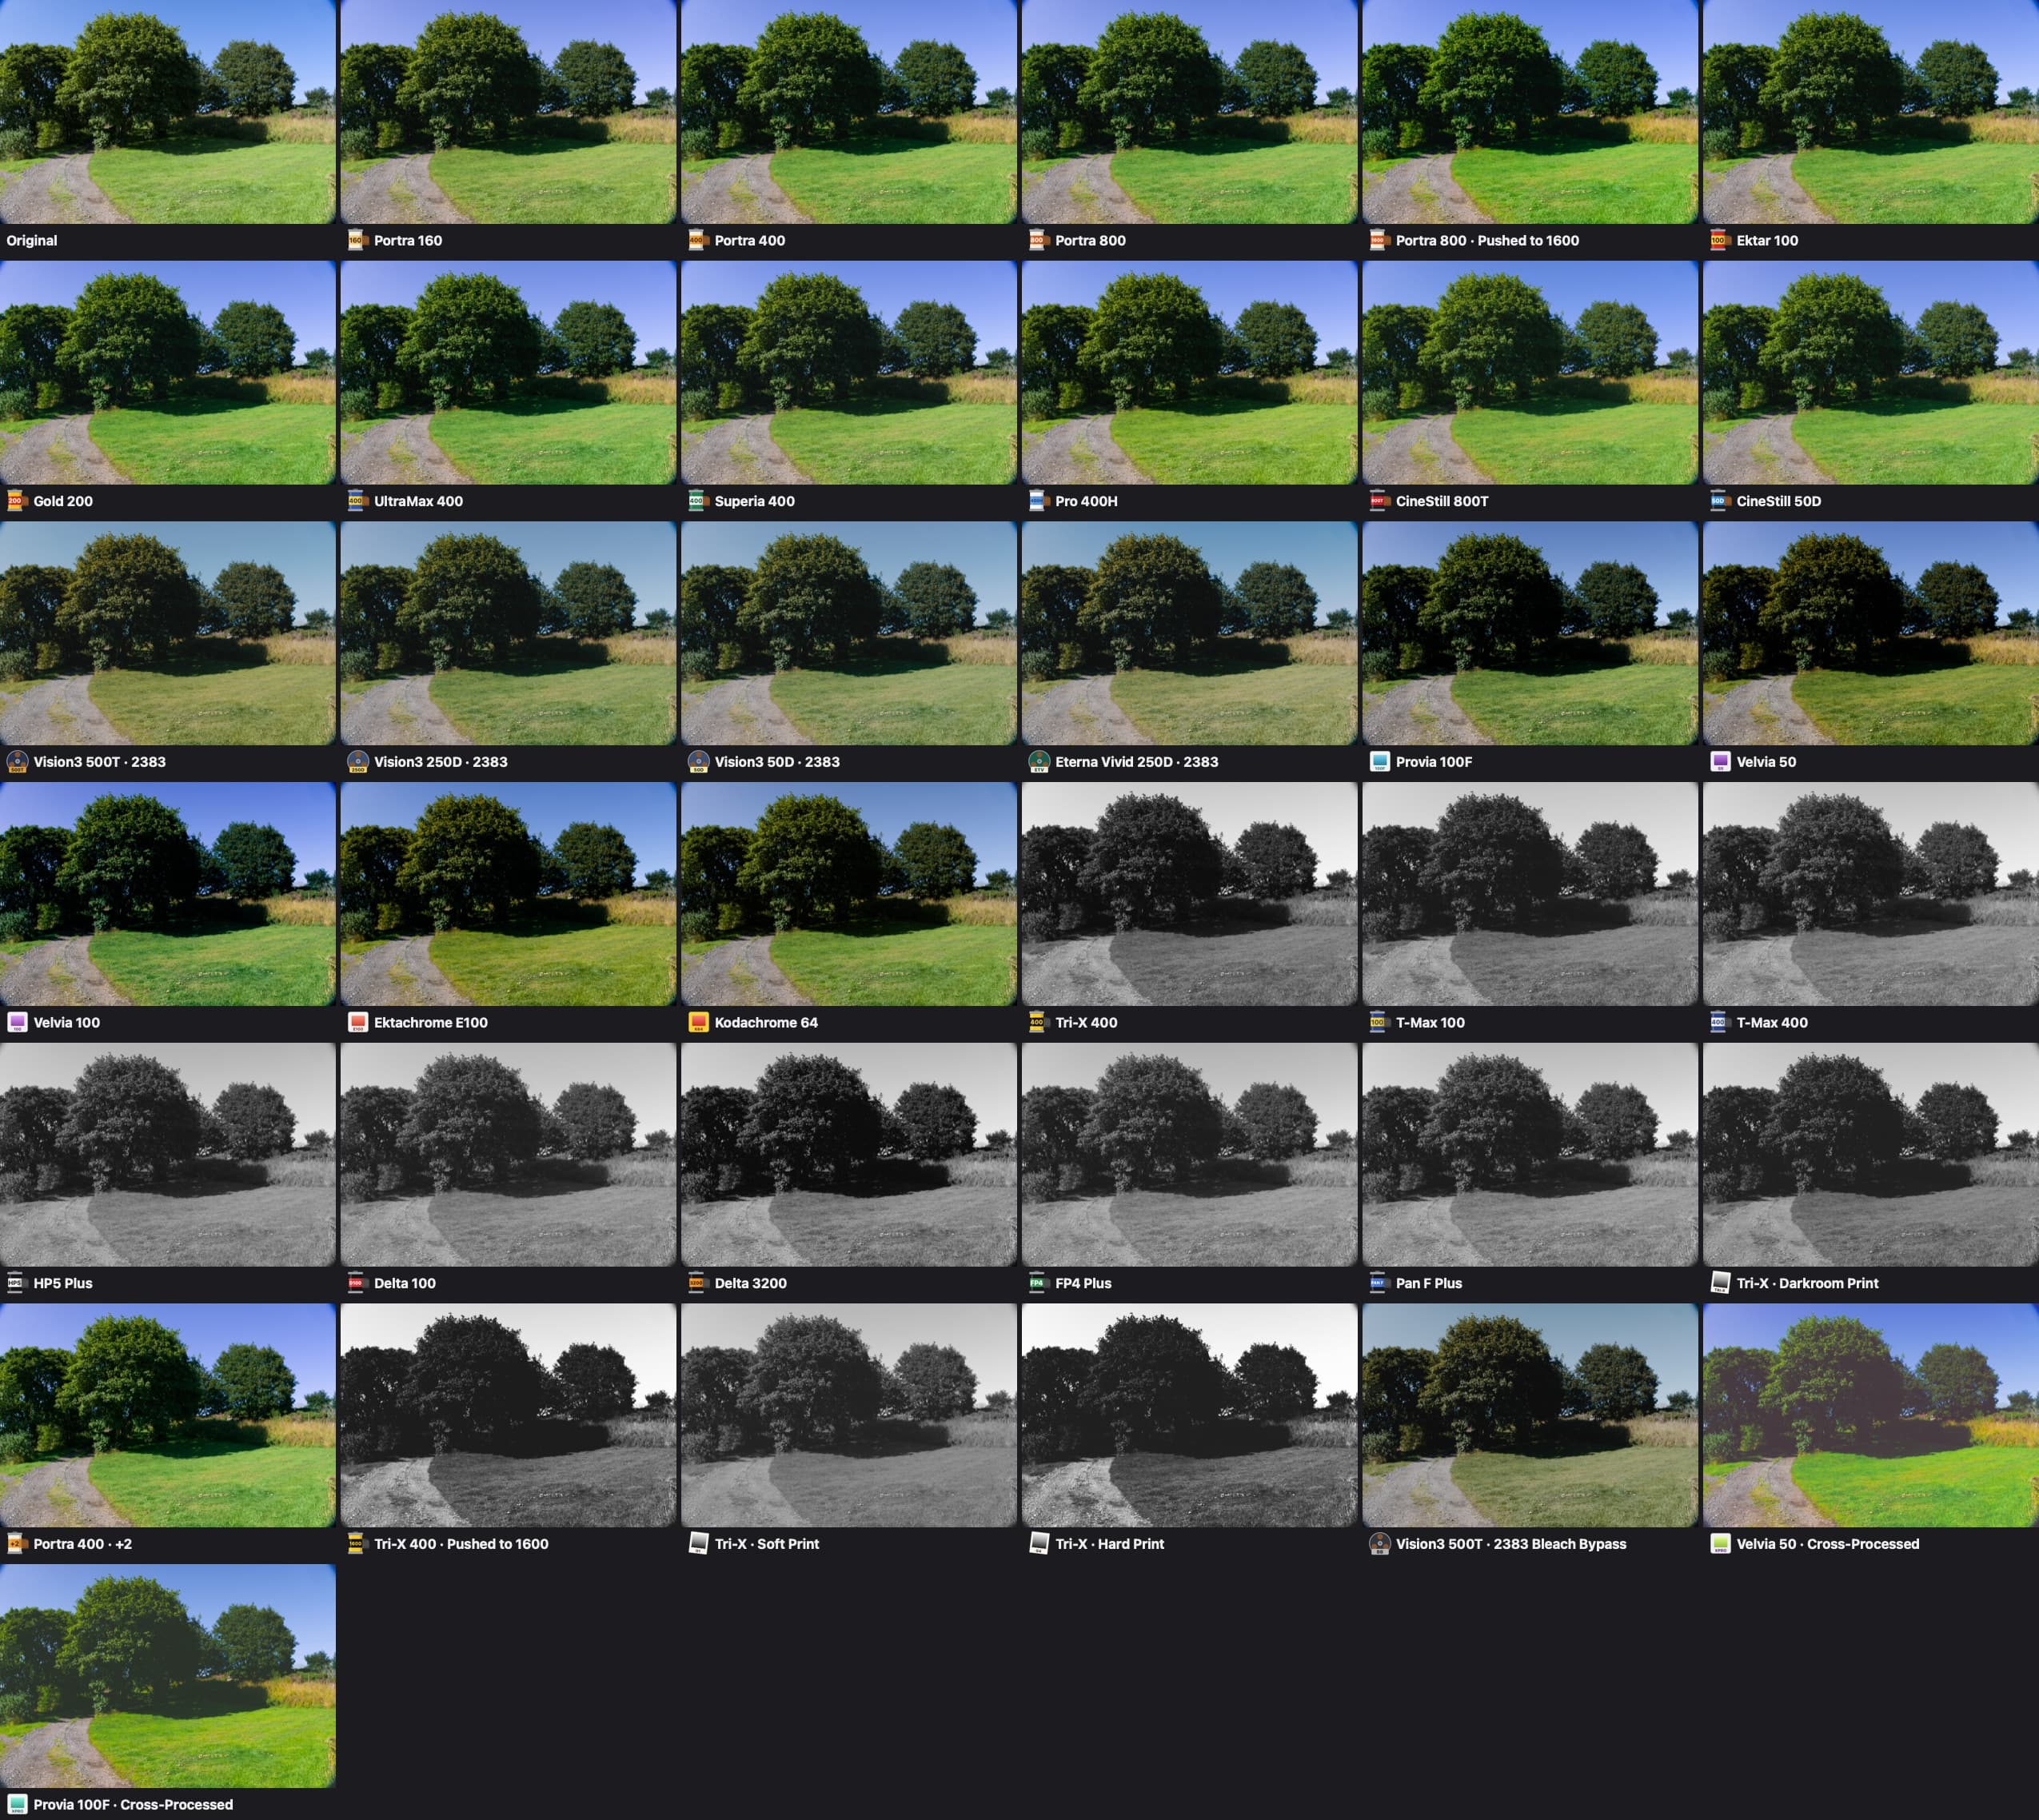
Every film look on the same photo, with the original first
Every look on one photo, the original first.

Kodak, Portra, Ektar, Gold, Vision3, Tri-X, Fujifilm, Superia, Provia, Velvia, Ilford, HP5, Multigrade and CineStill are trademarks of their owners. Redlamp isn't affiliated with them: its looks are built from the published technical data.

Roadmap

Mac first, then iPad and iPhone from the same engine.

Phases 1 to 4 build a high-quality editor and engine on macOS; iPad and iPhone follow in Phase 5. This roadmap is read from the README every time the site is built.

Phase 0

Foundations

largely done
6 of 8
  • mise and Tuist workspace, module graph with enforced boundaries, and an engine purity gate
  • LibRaw vendored as a pinned, static XCFramework (macOS, iOS, and Simulator; arm64 only)
  • Engine API contract, headless CLI, and a unit and engine smoke-test suite
  • Lightroom feature inventory
Show 4 more
  • GitHub Actions CI: purity gate, SwiftFormat lint, build, and tests, with cached LibRaw and fixtures
  • Performance lab: a CI runner on Apple Silicon with regression gates that block merges (iPhone and iPad tiers come with Phase 5)
  • Golden-image color regression tests (ΔE2000) for camera files, and a golden render for every bundled recipe version
  • Written clean-room policy and a license-audit gate in CI

Phase 1

First light

in progress; iterations 1 and 2 done
3 of 6
  • RAW pipeline core, fused develop kernel, cached pyramid, and latest-wins rendering
  • Develop workspace on macOS, Basic panel, histogram, before/after, sidecars, undo, and export
  • Layer and mask engine, with linear and radial gradient masks, local adjustments, and the Masking panel
  • Sandboxed XPC decode helper
Show 2 more
  • Render scheduler with priority lanes, tile cancellation, and thermal awareness
  • Coordinated sidecar I/O for iCloud Drive

Phase 2

Develop parity

in progress
5 of 15
  • Texture, Clarity and Dehaze, globally and inside masks
  • Detail panel: noise reduction scaled to each photo's measured noise, and noise-aware sharpening, with Lightroom's controls
  • Menon Bayer demosaic with a dual pass for flat noisy areas, hot-pixel repair and highlight reconstruction
  • Recipes: one format for presets, profiles and LUTs, Base Look tables, camera recipe cards, .cube and HaldCLUT import, 39 bundled recipes, and the Recipe Lab
Show 11 more
  • Before/After layouts, themes and a Settings window
  • Edge-aware Highlights and Shadows, and edge-refined Dehaze
  • Best-in-class classical noise reduction on raw data, profiled per camera and ISO
  • Better X-Trans demosaicing (Markesteijn)
  • Full DCP camera profiles (dual and triple illuminant), ICC input profiles, and .3dl and log-space LUT import
  • Film effects for recipes: halation (the red glow around bright lights), bloom and diffusion, and film grain that varies with density and scales with output size
  • Lens corrections from the lensfun database, Adobe LCP import, and DNG opcodes
  • Crop and straighten, Transform and Upright
  • Brush, color range, and luminance range masks, and Vision AI masks (subject, sky, background, people)
  • Slider-feel calibration against Lightroom, and Lightroom XMP preset import
  • Photos library integration and a Photos editing extension

Phase 3

Pro masking, healing, AI denoise, focus stacking, and looks

0 of 8
  • SAM-class object and people-part masks, mask refinement, mask presets, and syncing masks across photos
  • Healing, clone, and content-aware remove, with AI inpainting on the device
  • AI Denoise: an on-device model working on raw data, matching or beating the best commercial denoisers, with a fast 1:1 preview and non-destructive results
  • Focus stacking v1: stacks detected automatically in the filmstrip, alignment (including focus breathing and handheld sequences), depth-map and pyramid fusion strategies, a retouch brush, and results that stay fully editable (alignment, depth solve, fusion and redlamp stack done)
Show 4 more
  • Manufacturer lens corrections embedded in RAW files (Sony, Fujifilm, Panasonic, OM System)
  • redlamp-profiler: look matching by black-box measurement (raw-against-camera-JPEG fitting done: four measured film looks ship). Still to do: the remaining film simulations (Eterna, Classic Negative, Nostalgic Negative, Pro Neg, Acros, Reala Ace), which need a shoot with one camera, a chart matrix solve, and a DCP writer
  • Analogue film stocks: film and digital shot side by side with charts, scanned and fitted by the profiler, with halation, bloom and grain per stock
  • The agent recipe studio at scale: many more recipes developed from briefs, once the critics agree with human picks (about 200 pairwise verdicts)

Phase 4

1.0

0 of 4
  • Lightroom XMP sidecar import, HDR/EDR editing and export, and batch export
  • AI-assisted focus stacking: learned fusion and halo suppression, occlusion and motion handling, and good stacks from fewer or handheld frames
  • AI Super Resolution (2x and 4x) that stays faithful and doesn't invent detail
  • Accessibility, usability testing, and the Mac App Store release

Phase 5

iPad and iPhone

0 of 5
  • iPad and iPhone shells on the same engine (compact layout, touch, Apple Pencil), with in-process decoding
  • Coordinated sidecar I/O through Files, and edits moving between devices
  • Tiled rendering for large exports within iPhone and iPad memory
  • On-device timing of the AI models on iPhone and iPad, and performance-lab tiers for both
Show 1 more
  • App Store releases for iPad and iPhone

Unscheduled

Later

  • CloudKit sync with lightweight proxy RAW files
  • A library and catalog, tethered shooting, and panorama and HDR merge
  • More AI features, subject to the research below: lens blur, distraction removal, and personalized auto settings

Redlamp in 24 seconds

The Redlamp app icon: a glowing ruby safelight lens in a steel bezel

Open source

Free, open and yours to build on.

Redlamp is licensed under the Mozilla Public License 2.0, which is compatible with the App Store. Algorithms are implemented clean-room from papers and specifications, and contributions are welcome.
licenseMPL-2.0statusearly alpha previewcostfree forevercloudnone required

Build from source

An Apple Silicon Mac with macOS 26, Xcode 26 and mise.

$ git clone https://github.com/pdcgomes/redlamp.git && cd redlamp
$ mise install
$ mise run generate
$ mise run run

Homebrew (with the first release)

$ brew tap pdcgomes/redlamp https://github.com/pdcgomes/redlamp
$ brew install --cask redlamp